
Regular nail clipping is an essential part of dog grooming. Long nails can cause discomfort, pain, and even lead to injuries. If you’ve never clipped your dog’s nails before, it might seem a bit intimidating. Don’t worry! We’re here to help. In this article, we’ll guide you through the process of how to nail clip a dog, so you can keep your furry friend comfortable and happy.
See also: Dog grooming >>
What You’ll Need
Before you learn how to nail clip a dog, you’ll need a few essential tools:
- Dog nail clippers: There are two main types of dog nail clippers – scissor-style and guillotine-style. Choose the one that you find easiest to use.
- Styptic powder or pencil: In case you accidentally cut the quick, a styptic powder or pencil will help stop the bleeding.
- Treats: Rewarding your dog with treats during the process will help keep them calm and make the experience more enjoyable.
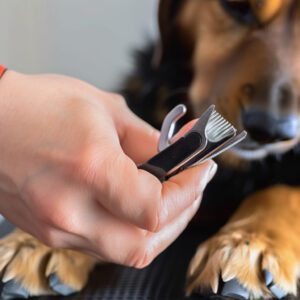
Step-by-Step Guide on How to Nail Clip a Dog
Step 1: Create a Calm Environment
Choose a quiet, well-lit room where your dog feels comfortable. Make sure they’re relaxed and have a secure place to sit or stand.
Step 2: Get Your Dog Used to the Clippers
Let your dog sniff and examine the clippers. Give them a treat to create a positive association with the tool.
Step 3: Hold Your Dog’s Paw Gently
Gently hold your dog’s paw and spread their toes apart. This will give you better access to the nails.
Step 4: Identify the Quick
The quick is the blood vessel that runs through the nail. In dogs with light-colored nails, you can see it as a pinkish area. Avoid cutting the quick, as it can cause pain and bleeding. If your dog has dark nails, proceed with caution and trim only small amounts at a time.
Step 5: Start Clipping
Hold the clippers at a 45-degree angle and cut the nail in a smooth, decisive motion. It’s better to cut small amounts and work your way up, rather than cutting too much in one go. Remember to give your dog a treat after each nail to keep them relaxed.
Step 6: Check for Rough Edges
After clipping each nail, check for any rough or jagged edges. If necessary, use a nail file or grinder to smooth them out. This will prevent any discomfort for your dog while walking.
Step 7: Praise and Reward Your Dog

Once you’ve finished clipping all of your dog’s nails, give them plenty of praise and a final treat. This will help them associate nail clipping with positive experiences and make future sessions easier.
Additional Tips for Nail Clipping Success
- Clip your dog’s nails every 3-4 weeks to maintain a healthy length.
- If your dog is anxious or fearful, consider working with a professional groomer or veterinarian who can provide guidance and support.
- Regularly handling your dog’s paws will help them become more comfortable with the nail clipping process.
Learn More About Dog Grooming
If you’re interested in learning more about dog grooming, check out our other articles:
- Puppy Nail Trimming: A Guide to Clipping Your Puppy’s Nails Safely
- A Step-By-Step Guide to Cleaning a Dog’s Ears
- Washing a Dog
- How to Trim Puppy Nails: A Stress-Free Guide for You and Your Pup
- Cleaning Dogs Teeth
- Dog Grooming Tips
- How to give a dog a bath
Now that you know how to nail clip a dog, you can confidently keep your pet’s nails in check. With patience, practice, and a little bit of love, nail clipping will become a breeze for both you and your furry friend. Happy grooming!